WEAR & GRIP LOSS EVALUATION OF HIGH CHROMIUM WELDING DEPOSITS APPLIED ON SUGAR CANE ROLLS
ABSTRACT
Wear on sugar cane rolls is an expensive maintenance problem for the sugar cane industry. Wear produces loss of sucrose extraction and loss of grip of the roll on the bagasse. This paper presents the evaluation of wear and loss of grip of hypoeutectic and hypereutectic high chromium welding deposits applied on ASTM A-36 steel and gray cast iron. A modified ASTM G-65 standard test was used. Wear was produced by the abrasive action of wet bagasse with three levels of mineral extraneous matter. Silica grains with sizes in the range of 0.212-0.300 mm (AFS 50/70) were used as mineral extraneous matter. Grip was evaluated by measuring the torque on the power transmission shaft that moves the specimens. Worn surfaces were characterized by using scanning electron microscopy. Wear was found to increase proportionally related to the mineral extraneous matter content. Geometric changes of the weld deposits related to wear caused grip loss. For low mineral extraneous matter level, wear resistance of carbon steel was greater than that of gray cast iron; whereas the opposite was found for high mineral extraneous matter level.
INTRODUCTION
One of the most important stages of the sugar cane process is crushing, where juice is extracted from the shredded cane by compressing it between grooved rolls. Wear on rolls is a common problem in the sugar industry, which directly affects the efficiency of the juice extraction. The main cause of such wear has to do with the presence of Mineral Extraneous Matter (MEM) like soil from the fields or metallic particles generated from previous stages of the process, such as shredding. Wear produces loss of the original geometry of the teeth of the rolls producing loss of compaction and decreasing the extraction. Moreover, wear produces loss of roughness on the roll surface [1] and decreases the grip of the roll over the sugar cane producing a poor feeding to the mill. Hardfacing welding deposits are applied to the teeth to protect the surface and decrease wear, since these hardfacing deposits are made with alloys of high wear resistance. However, the use of these alloys increases the cost of maintenance. Also, some welded particles are eventually detached from the rolls and contaminate the cane, affecting later stages of the process.
Commonly, rolls are made of gray cast iron because it is not as expensive as steel and has better machinability. However, gray cast iron has poor weldability, which may generate cracking on the weld deposits and the base material, with the collateral loosening of the hardfacing.
It has been found that wear on low carbon steel due to the action of bagasse increases as the MEM contained in the bagasse increases, and also as a result of an increase in the contact force at the interface bagasse–steel [1]. Wear produced by bagasse and MEM on high chromium (Fe-Cr-C) hypoeutectic and hypereutectic welding deposits was evaluated on laboratory tests [2] where it was found that the applied force between the bagasse and the specimen had a significant effect on wear, but no important difference between the hypoeutectic and hypereutectic alloys was found. The effect of the geometry of the deposits was not evaluated on that study since the specimens were ground before the wear test to produce a regular surface. The effect of sugar cane juice and the MEM content on wear of carbon steel has also been evaluated [3]; it was found that juice increased the wear by a wear-corrosion synergy. Later, the effect of juice and MEM was also evaluated on carbon steel buffered with austenitic stainless steel welding [4] where no significant improvement was achieved with stainless steel with respect to carbon steel. An important factor on wear of rolls hardfaced with weld deposits is the geometry of the deposits [5]. The geometry and roughness influence the performance of the mill because a high roughness produces good grip over the bagasse [5]. However, when the roll surface has been polished due to wear, the grip is loss and the feeding of bagasse to the mill is decreased; therefore, the performance of the mill is also decreased. Previous studies [6] evaluated the effect on wear response of the distance between welding deposits and it was found that wear decreased as distance decreased. However, it is possible that deposits with small distance generate also a smaller grip due to the resulting smaller roughness on the surface of the specimen; therefore, deposits with low distance might not be the optimal configuration.
The microstructure and mechanical properties of Fe-Cr-C welding deposits have been previously studied [7]-[9]. Other works, regarding different items besides the microstructure, have evaluated the wear resistance of these alloys [2], [10]- [12]. However, to the best of our knowledge, the effect of the wear on the grip has not been evaluated.
This paper shows the results of a research project undertaken to evaluate wear and grip loss produced by wear on two base materials: ASTM A-36 steel and gray cast iron class 50, both materials hardfaced with hypoeutectic or hypereutectic high chromium white cast irons. Wear was quantified by the weight loss of the specimens and the grip loss was quantified measuring the torque on the shaft of the specimen’s holder. The main contribution of this study was the correlation found between wear and grip loss.
1. MATERIALS AND METHODS
Tests were performed using a machine where specimens slide against compressed bagasse. A 50 mm diameter and 38 mm pitch extrusion screw took the bagasse from a hopper and compressed it inside a tube. Specimens were V-shaped, similar to the tooth of a roll, and were obtained by cutting a 282 mm external diameter ring in eight equal circular segments. In this way, the segments could be weighted using a scale with a 0.01 g resolution. After cutting, specimens were hardfaced by welding and assembled back around a disk to conform the whole ring again. The assembled unit then is made to rotate and slide against the extruded bagasse coming from the tube. Figure 1A shows a scheme of the prototype used for the tests. Figure 1B corresponds to the machine during a test where the specimens sliding against bagasse could be observed. The load used to compress the bagasse (P in Figure 1A) was controlled with a weight applied upon a mechanism formed by a pulley and a gear-rack system. This mechanism amplifies the load and applies it to the screw in axial direction. A load of 600 N was used for all the experiments. More details, dimensions, and working conditions of the prototype were presented elsewhere [1].
Figure 1. (a) Schematic representation of the wear machine. (b) Photograph of the machine during a test
w1 is the angular speed of the specimens (20 rpm), w2 is the angular speed of the screw (28 rpm), P is the force between the bagasse and the specimen (600 N). Source: Casanova and Aguilar [1].
The MEM content was controlled for every group of specimens. The abrasive material used for the ASTM G-65 standard test, i.e, rounded silica grains with size ranging between 213 and 300 µm diameter, was used as MEM. This abrasive material was chosen since it has been previously used in similar studies [1], [2]. Also, the use of this standard abrasive material allows some comparison with other studies and makes easy the reproduction of experimental conditions in future studies. The contamination level was quantified by using the ratio DFR (Dirt to Fiber Ratio) defined as [13]:
Where Ws is the weight of silica and Wf is the weight of fiber. Three values of DFR: 0, 0.15 and 0.5 were evaluated. To suitably simulate the wear in the crushing process, water and juice were added to the bagasse silica mixture. The quantity of water and juice (in Liters) was determine with the equations [14]:
where the weight of the bagasse (Wbagasse) must be in kilograms. The specimens made of steel were initially buffered with a layer of E309LT1 stainless Steel applied by using the Flux Cored Arc Welding (FCAW) process. Over this stainless steel layer, white cast iron hardfacing was applied using two electrodes: WS-380 or O-8660 corresponding to hypoeutectic and hypereutectic alloy respectively. For the case of the specimens made of gray cast iron, the deposits of white cast iron were welded directly on the specimen (without stainless steel buffer). Table 1 shows the welding parameters and Table 2 shows the chemical composition of the electrodes.
Table 1. Welding parameters
Source: author’s own presentation
Table 2. Chemical composition of the electrodes
Source: author’s own presentation
Each test was performed with three specimens which, prior to the test, were washed with acetone, dried, and weighted. The test consisted in sliding the group of specimens against compressed bagasse a total distance of 45,000 m. After the test, specimens were washed with acetone, dried, and weighted again. The difference between the initial and the final weight is presented as the measure of wear in the specimen.
The surfaces of the weld deposits located at the top and on the flank of the teeth were characterized through the use of Scanning Electron Microscopy (SEM). Grip was quantified by using the torque needed to rotate the specimen holder. Torque was measured using a Torquetrak 9000 system (Binsfeld Engineering Inc, Maple City, MI), based in strain gauges bound on a tubular coupling located between the ring driven shaft and the engine. This coupling has less stiffness than the solid shaft where the specimen holder is mounted. In this way the sensitivity of the torque measurement was increased. The voltage signal of the Torquetrak was registered with a USB-1280LS (Measuring Computing, Norton, MA) data acquisition system with 12 bits resolution and a sampling rate of 1 kHz. The total resolution of the system was 5 N-m, which was estimated by taking a set of data with the machine rotating without contact between specimens and bagasse.
Torque was measured with the specimens in contact with the compressed bagasse at the beginning of the wear test. After the wear test (after the distance of 45,000 m), torque was measured again and the grip loss was calculated as the difference between the torque values before and after the wear test.
2. RESULTS
2.1. WEAR AND GRIP MEASUREMENTS
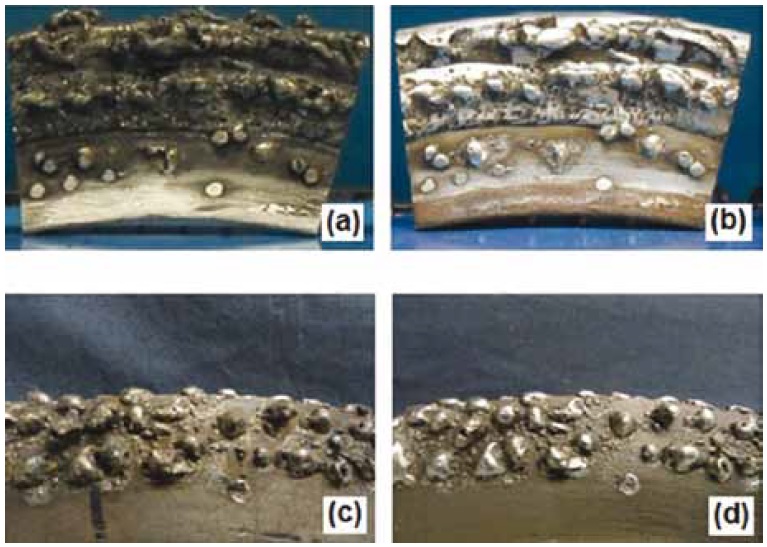
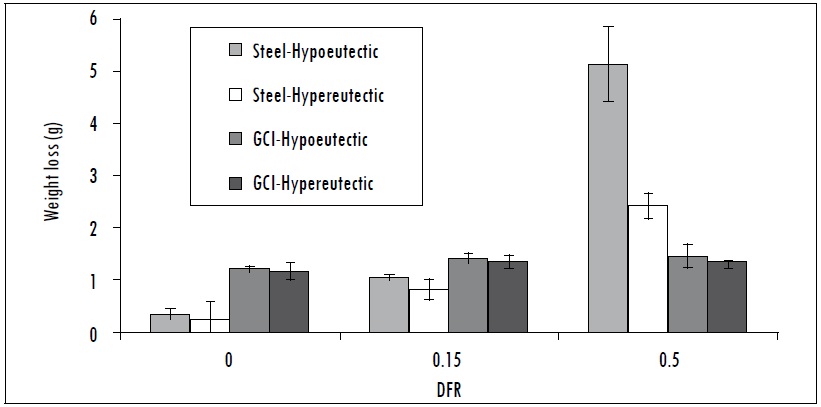
Figure 2 shows steel and gray cast iron specimens hardfaced with hypereutectic welding worn with DFR = 0.5 before and after the wear process. It can be observed the polishing and change in the geometry of the deposits as a consequence of wear. The top of the specimen was more severely worn than the flank. Figure 3 presents the results of wear for the three levels of contamination (DFR) and the four combinations of materials evaluated. For the steel specimens, wear increased as the MEM contained in the bagasse increased. However, for the gray cast iron specimens, a small increase of wear was observed when MEM was increased. For the first two levels of contamination (DFR 0 and 0.15), the steel specimens presented greater wear resistance than the gray cast iron specimen; but the opposite happened for the maximum contamination level (DFR = 0.5). In general, wear on specimens hardfaced with hypoeutectic welding was greater than those hardfaced with hypereutectic material.
Figure 2. Steel and gray cast iron specimens hardfaced with hypereutectic White cast iron before and after the wear process using high MEM content (DFR=0.5), (a) and (b) steel in the initial and final condition respectively, (c) and (d) gray cast iron before and after wear respectively
Source: author’s own presentation
Figure 3. Wear measured as weight loss of the specimens for the three contamination levels
GCI: gray cast iron. Source: author’s own presentation
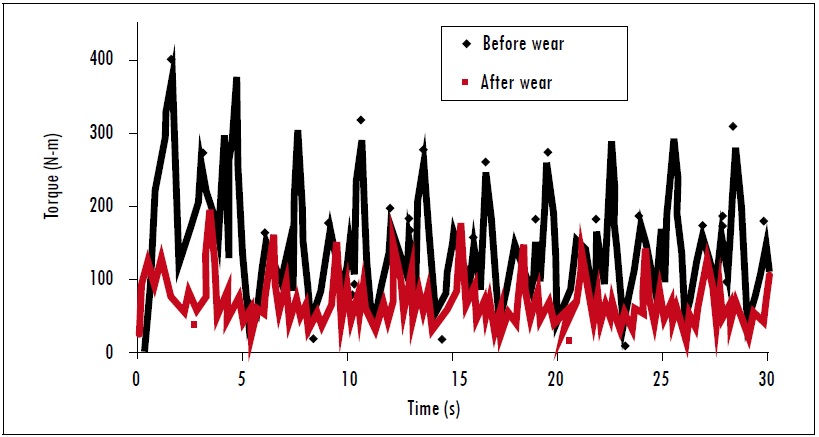
The torque for a specimen hardfaced with hypereutectic material as a function of time, before and after the wear test, is shown in Figure 4. The periodic pattern in the torque signal was produced by the uniform distribution of the three specimens in the 360° of the holder and by the fact that the specimens are rotating; therefore, each specimen passed in front of the bagasse at approximately equal time steps. The average value of the peak values was taken to compare the torque in the original and the worn condition. It was found that torque decreased after wear.
Figure 4. Torque measured on the holder drive shaft before and after wear
Note. Each peak corresponds to the lapse of contact between a welded specimen and the compressed bagasse. Curves obtained for specimens hardfaced with hypereutectic material and worn with 0 DFR Source: author’s own presentation
The grip loss (torque loss) produced by wear is shown in Figure 5. No clear trend of grip loss regarding the evaluated conditions was observed, except for the specimens evaluated with 0.5 DFR, where a grip loss significantly greater with respect to the other contamination levels was found. The high dispersion of the data, related with the high variability in the torque, was probably due to the irregular geometry of the welding deposits.
Figure 5. Grip loss measured as torque decrease
GCI: gray cast iron. Source: author’s own presentation
2.2. SCANNING ELECTRON MICROSCOPY
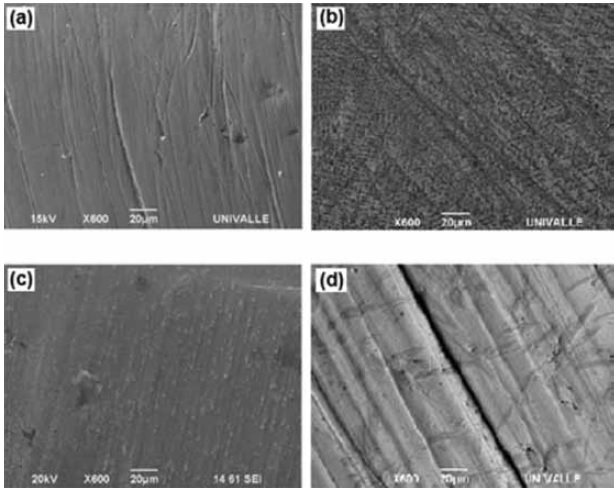
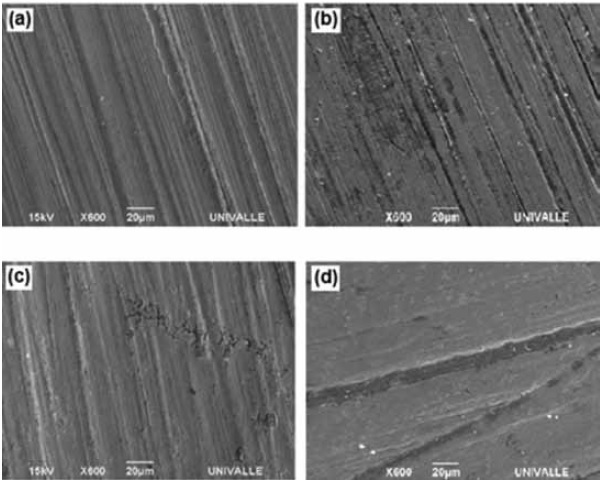
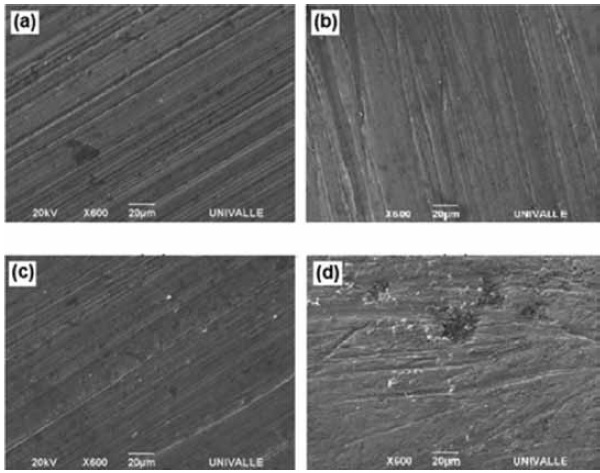
Worn surfaces of the welding deposits located at the top and the flank of the specimens were analyzed by means of scanning electron microscopy. Figure 6 shows the worn surfaces at the top of the specimens tested with 0 DFR, where grooves produced by plastic deformation or cutting due to the action of bagasse can be observed . Figures 7 and 8 show surfaces tested with DFR = 0.15 and DFR = 0.5 respectively. No clear differences were found in the grooves produced under these two contamination levels, but both are clearly deeper that those produced with DFR = 0 (Figure 6). On the surfaces of hypoeutectic alloy, cutting and grooves generated by plastic deformation were observed. Besides cutting and plastic deformation, carbides detachment was also observed on hypereutectic alloys, similar to the one reported in previous studies [10] for deposits with high chromium content.
Figure 6. Surfaces tested with DFR = 0: (a) steel + hypoeutectic, (b) gray cast iron + hypoeutectic, (c) steel + hypereutectic, (d) gray cast iron + hypereutectic
Source: author’s own presentation
Figure 7. Surfaces tested with DFR = 0.15: (a) steel + hypoeutectic, (b) gray cast iron + hypoeutectic, (c) steel + hypereutectic, (d) gray cast iron + hypereutectic
Source: author’s own presentation
Figure 8. Surfaces tested with DFR = 0.5: (a) Steel + hypoeutectic, (b) gray cast iron + hypoeutectic, (c) Steel + hypereutectic, (d) gray cast iron + hypereutectic
Source: author’s own presentation
3. DISCUSSION
In this study we evaluated wear and grip loss on high chromium white cast iron weld deposits under the action of bagasse contaminated with mineral extraneous matter, in conditions similar to those present in a sugar cane mill. In agreement with previous studies [1], [3], [4], steel specimens presented greater wear with higher MEM content. However, the influence of MEM was less remarkable on gray cast iron specimens. This behavior may be due to the higher abrasion resistance of gray cast iron with respect to stainless steel. With high MEM contents, more abrasive particles may be in contact with the base material or buffer, in the case of the steel specimens, and in this way the global wear may be strongly affected by the behavior of the base material. In general, wear of hypoeutectic deposits was greater than that of hypereutectic deposits, which may be explained by the higher hardness of hypereutectic alloys. However, in a previous study [2], no significant difference between both alloys was detected. The reason behind the difference between the results of the aforementioned study and this study could be attributed to the difference of the tested surfaces. While in the present study experiments were performed on the rough, irregular as-weld surfaces, in the previous study [2] surfaces were ground before testing. With grinding, the top layer of the welding is detached, which in general is the hardest, and contains the higher number of primary carbides in the case of the hypereutectic alloy. For this reason, the as-weld surface might have greater wear resistance.
Abrasive particles, in a range of size considerably higher than the MEM used in this study, are present in an industrial mill. With respect to the abrasive size, it has been reported that wear of a homogeneous material increases as the size of the abrasive increases up to a critical value. Beyond that critical value the wear rate is keep constant [15]. Similar findings have been reported recently for high chromium white cast iron [16], where the increase in abrasive size never decreased wear. Therefore, although it is possible that wear would be increased with an abrasive bigger than the one used in this study, it is not expected to change the trend of the results of this study, and the comparison among the tested conditions is expected to remain valid. It is important to note that several microstructures were evaluated and the size of the abrasive could affect each microstructure in a different way. This aspect should be evaluated in future studies. No clear trend was observed for the grip loss with respect to the tested conditions, except for the specimens made of steel tested with high MEM content, where grip loss was significantly greater. This result is in agreement with the wear results, since the specimens with more severe wear also had the greater grip loss. This behavior is well known in the sugar industry where one of the symptoms of wear is the deficient feeding on the mill or the difficulty of the sugarcane to enter to the mill, which is due to the smoothed surfaces of the rolls produced by wear. To the best of our knowledge, this is the first study where wear and grip loss are quantitatively evaluated. Therefore there are no previous studies to compare our results.
One of the main limitations of this study is the difference in topography and roughness of the specimens, which is difficult to control in a manual welding process. These geometric differences may affect the wear and torque results. Future studies are needed where different geometries are generated with more control over the topography, and complementary data is gathered. This is to be done with the aiming at the final goal of building a comprehensive mapping between topographic features and expected wear/grip response.
Although the microstructures of the deposits analyzed in this study were different from those evaluated in a previous study performed by our group [4], no significantly different wear mechanisms were found. Despite the hardness of the white cast iron deposits, carbides detachment was seldom observed, and the main wear characteristics were grooves produced by cutting and plowing, which is similar to those found in other microstructures with lower hardness and higher ductility, such as the ones of the stainless steel evaluated by Victoria et al. [4]
CONCLUSIONS
Wear evaluated using weight loss showed a significant increase as a function of the contamination level for high chromium white cast iron weld deposits applied on specimens made of steel. However for deposits applied on specimens made of gray cast iron, the wear rate decreased as the contamination level was increased. Regarding the base material, for the two first levels of contamination steel specimens presented greater wear resistance. But for the maximum level of contamination, gray cast iron presented greater wear resistance. Therefore, steel would be recommended only for sugar mill plants where relatively clean sugarcane is processed.
It was found that changes in the geometry of the deposits produced by wear were directly related with the decrease of grip. According to this result, the deposits should have a geometry such that even if they are worn, a relatively rough surface should be kept.
S. Díaz Millán, Y. Aguilar Castro, and F. Casanova, “Wear and grip loss evaluation of high chromium welding deposits applied on sugar cane rolls”, Ing. Unv., vol. 19, no. 2, pp. 267-281, 2015.
REFERENCES
[1] F. Casanova and Y. Aguilar, “A study on the wear of sugar cane rolls”, Wear, vol. 265, pp. 236-243, 2008.
[2] V. E. Buchanan, P. H. Shipway and D. G. Mccartney, “Microstructure and abrasive wear behavior of shielded metal arc welding hardfacing used in the sugarcane industry”, Wear, vol. 263, pp. 99-110, 2007.
[3] Y. Aguilar, F. Casanova, R. Victoria, D. Aguirre y B. Uquillas, “Desgaste en acero de bajo carbono debido a la acción de bagazo limpio o contaminado con sílice y jugo de caña”, Ingeniería y Universidad, vol. 15, no. 2, pp. 373-384, 2011.
[4] R. Victoria, B. Uquillas, J. Y. Aguilar, Y. Aguilar and F. Casanova, “Abrasive wear effect of sugarcane juice on sugarcane rolls”, Wear, vol. 270, pp. 83-87, 2010.
[5] S. Kroes, “Enhanced roll life”, Proc. Aust. Soc. Sugar Cane Technol, vol. 21, pp. 307-312, 1999.
[6] L. Durán, Y. Aguilar, O. Hernández, R. Victoria y F. Casanova, “Efecto de la geometría de los depósitos de soldadura de recubrimiento en el desgaste de acero bajo al carbono en contacto con bagazo de caña de azúcar”, Ingeniería y Universidad, vol. 17, no. 1, pp. 117-141, 2013.
[7] V. Buchanan, “Solidification and microstructural characterisation of iron-chromium based hardfaced coating deposited by SMAW and electric arc spraying”, Surface & Coatings Technology, vol. 203, pp. 3638-3646, 2009.
[8] M. Filipovic, Z. Kamberovic, M. Korac and M. Gavrilovski, “Microstructure and mechanical properties of Fe-Cr-C-Nb white cast irons”, Materials and Design, vol. 47, pp. 41-48, 2013.
[9] P. Mendez, N. Barnes, K. Bell, S. Borle, S. Gajapathi, S. Guest, H. Izadi, A. Gol and G. Wood, “Welding processes for wear resistant overlays”, Journal of Manufacturing Processes, vol. 16, pp. 4-25, 2014.
[10] V. E. Buchanan, P. H. Shipway and D. G. Mccartney, “A comparison of the abrasive wear behavior of iron-chromium based hardfaced coatings deposited by SMAW and electric arc spraying”, Wear, vol. 264, pp. 542-549, 2008.
[11] N. Yuksel and S. Sahin, “Wear behavior-hardness-microstructure relation of Fe-Cr-C and Fe-Cr-C-B based hardfacing alloys”, Materials and Design, vol. 58, pp. 491-498, 2014.
[12] R. Zahiri, R. Sundaramoorthy, P. Lysz and C. Subramanian, “Hardfacing using ferro-alloy powder mixtures by submerged arc welding”. Surface & Coatings Technology, in press.
[13] C. M. Downing, S. A. Loughran and S. A. Domanti, “Crushing soil contaminated sugar cane”, Proc. Aust. Soc. Sugar Cane Technol, vol. 21, pp. 294-300, 1999.
[14] D. Aguirre y H. Castañeda, “Sinergia abrasión-corrosión dada en los molinos de caña producida por el bagazo y el jugo de la caña”, tesis de pregrado, Universidad del Valle, Cali, Colombia, 2009.
[15] A. Misra and I. Finnie, “Some observations on two-body abrasive wear”, Wear, vol. 68, pp. 41-56, 1981.
[16] J. J. Coronado and A. Sinatora, “Effect of abrasive size on wear of metallic materials and its relationship with microchips morphology and wear micromechanisms: Part 1”, Wear, vol. 271, pp. 1794-1803, 2011.

